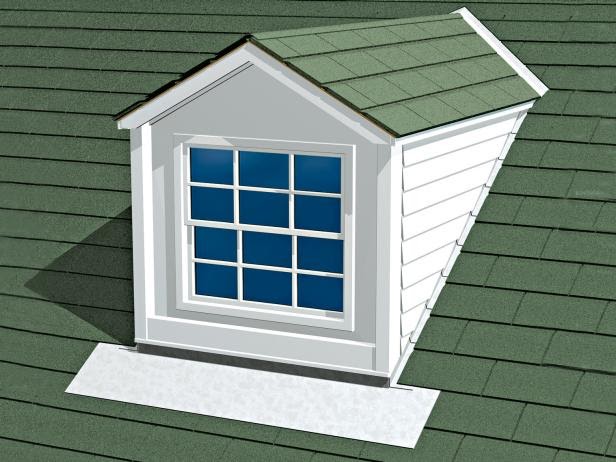
Flashing helps direct the flow of water around openings. Since water can seep into your home’s walls, deteriorating building materials, causing structural damage, and creating moisture and mold problems, it is very important to properly install flashing when constructing a new house or altering the exterior of a house. Flashing is used beneath the first course above ground level in a masonry building, above all wood trim on shelves, doors, and windows, where exterior stairs and decks attach to the house, and around any features in the roof structure. Below are some of the common flashing details on residential roofs.
Flashing Materials
Flashing can be made of sheet metal, plastic or composite materials. Sheet metal flashing is the most durable, and usually the most expensive choice. Copper or stainless steel can be used as flashing. Plastic flashing, usually PVC-based, is a less expensive alternative to metal, but if parts are exposed, it can wear with direct sun contact.
Dormer

Metal flashing is usually chosen for dormer windows. Flashing squares are inserted between each row of roofing material. Flashing can also be used as a strip that runs around the dormer and under the roofing material. Unlike other windows in your home, the flashing is also extended into a front apron, which overlaps the roof material. As dormer size and window style vary from house to house, the details can be different for your house.
Skylight

Flashing around skylights is usually a continuous piece. Skylights are raised using a wood curb, allowing enough room for flashing material. The National Roofing Contractors Association recommends that this is an 8-inch vertical run. If you are re-roofing your house you may need to raise or remove your skylight for the installation of proper flashing. Even if your skylight is manufactured with flashing attached, you may need additional flashing.
Vents
No matter the shape of your roof, vents are a common feature of any roof structure. If you are roofing around an already-installed vent, you may need to alter the height of the flashing detail around the vent. If you are cutting out a hole in your roof to accommodate a new vent, be careful to cut a clean hole, to minimize any extra work that will be needed to complete your project.
Hood Vent

Hoods can vent through the wall or through the roof. In order to save time, materials, and potential for problems, always choose the shortest option for venting. Shown here is a roofing option. If you are installing a new vent, you will be cutting a hole in the roof. After placing the vent in the hole, slip the flashing flange under the shingles above the vent. The flashing will be over the shingles below the vent. Seal the joints. Place the vent cap on top of the vent.
Pipe Vent

When you are roofing around a pipe vent (also called a pipe stack), you will need to cut out the shape of the pipe from the row of shingles. Fit the shingle row around the bottom part of the pipe. Then, slide pipe flashing over the pipe so that it extends 4 inches below the pipe, 8 inches above the pipe, and 6 inches to the right and left. The bottom part of the flashing will overlap the shingle row, as shown.
Chimney Flashing

Metal or PVC-based strips cover the joint between the roof and the chimney. They are bent in the corner and overlapped on one side by the edges of the shingles, and on the other by the cap flashing, which is attched into the mortor joints of the chimney’s brickwork.


